
Topic: RadioSparx - Custom Features (Stations, Schedules, Ads, and Auto-DJ)
Article ID: KB4025
Last Reviewed: May 31, 2019
What is the Auto-DJ and How does it Work?
The Auto-DJ service is an optional add-on capability that works in tandem with the V-Count People Counting technology to automatically have the music selection change in real-time based on intra-day fluctuations in the number of people present in a store or venue. This lets the energy level of the music change automatically and dynamically in response to changing traffic in the store/venue.
How Does It Work?
When Auto-DJ is activated for a client who has installed V-Count People Counting technology in their stores, the V-Count system uploads "occupancy" data to an FTP server here at RadioSparx every 5 minutes (configurable interval). The Auto-DJ system reads this FTP data and when there is new data for any location, it updates the occupancy data for each store for which new data was received. Then as each next track plays for each store, the Auto-DJ looks at the current occupancy level for the store and selects the station that you configure for each traffic tier (Low, Mid-Low, Mid, Mid-High, and High traffic) for each location.
Here below is a screen snapshot of the Auto-DJ control, followed by an explanation of each of the different parts of the screen:
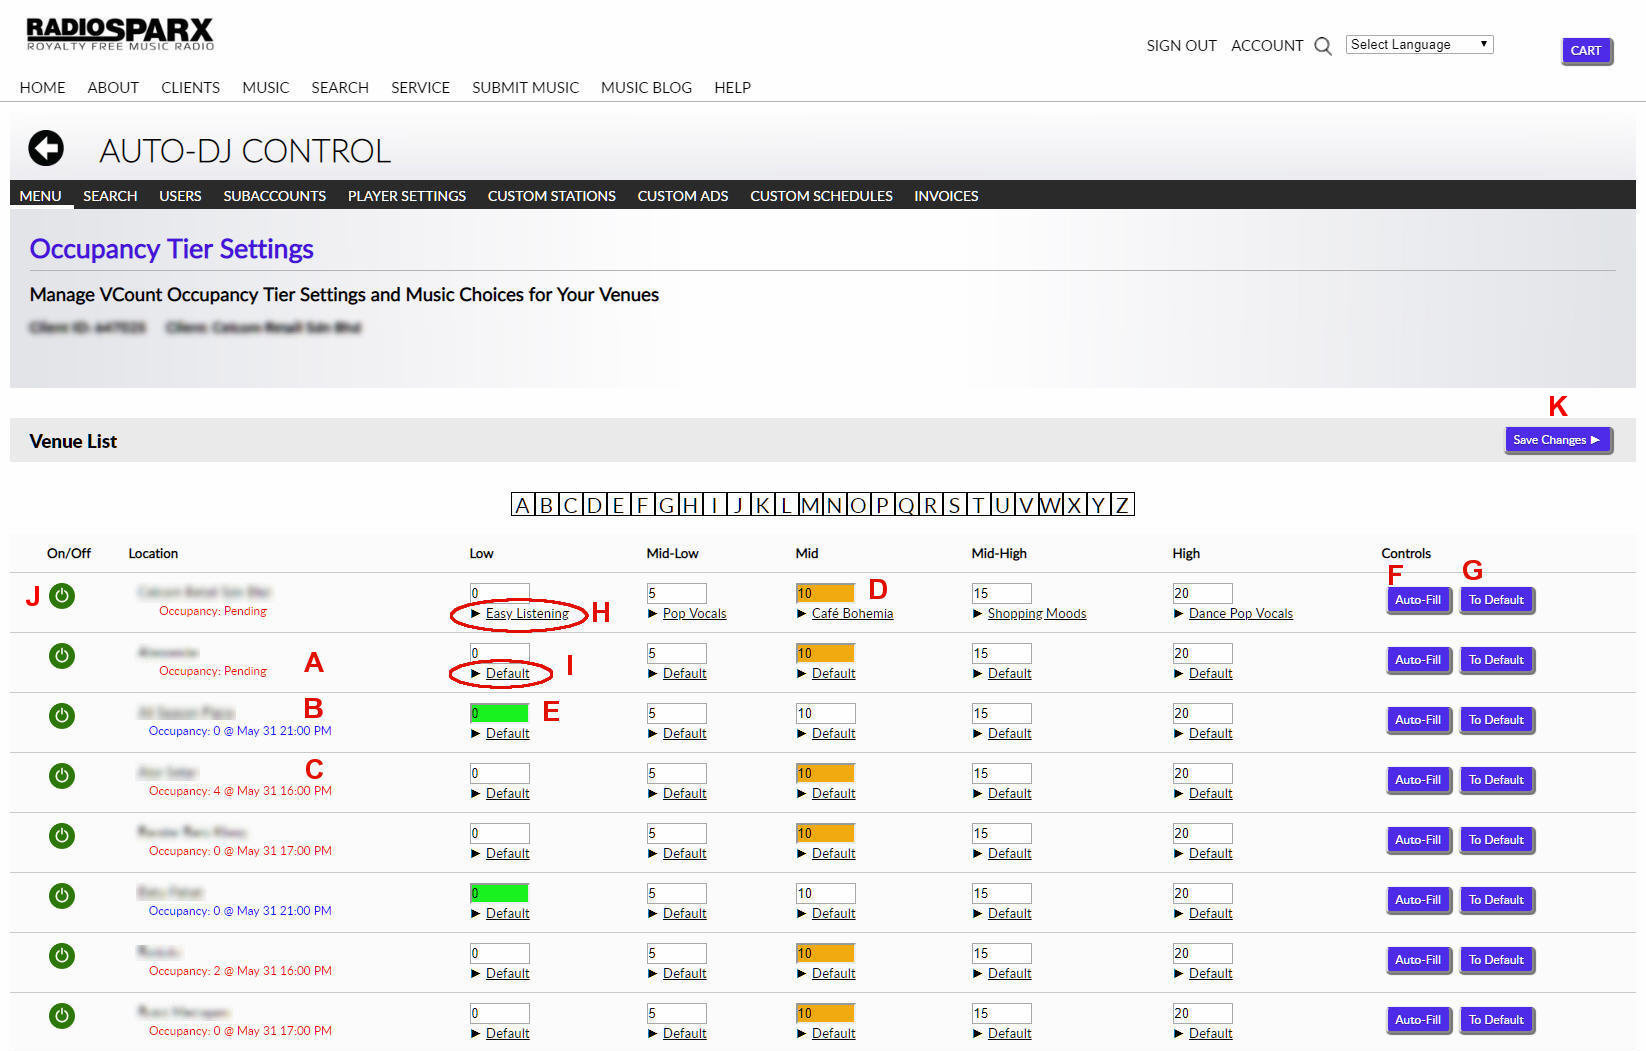
Explanations for Each Letter Above
A – When you see Occupancy: Pending in red, this means that no data has ever been received for that location.
B – When you see the Occupancy data in blue, that means that recent FTP data was received for that location.
C – When you see Occupancy data in red but with data following it, that means that data was received at some point, as of the date/time listed, but that the data is now outdated and has not been received within the anticipated time frame (i.e. generally 5 or 10-minute intervals) and so the last occupancy value received is considered "stale" at that point.
D – When a location is showing orange in the “Mid” tier, this means that the Auto-DJ has not received any new occupancy data within the anticipated time frame. This causes the Auto-DJ to revert to the mid-point occupancy since it has no way of knowing what the true occupancy is at that moment. You will see this in effect for any location where the Occupancy information on the left side is listed in red color (e.g. no data received yet, or last data received was longer than 5 or 10 minutes ago) .
E – When one of the tiers appears in green color, this means that recent occupancy data has been received and the Auto-DJ is playing the playlist selected for that particular tier for that particular location.
F - The Auto-Fill button can be used to automatically fill in the Mid-Low, Mid, and Mid-High occupancy values based on the settings of the Low tier and the High tier. You would configure the high tier with the highest average occupancy level that occurs for each location. Leave the Low tier set to zero, and click the Auto-fill button to have the middle tier values be automatically filled in. NOTE: After making any changes to the tier occupancy settings, make sure to click SAVE to store the currently displayed values in the database.
G – The “To Default” button will set any location’s selected playlists for all its tiers to match the playlist settings for the first location listed on the screen (i.e. the "Head Account" for the client using Auto-DJ).
H – This indicates which station is selected for the tier. You can change the station by clicking the link and then browse into a genre and select the desired station to play for that tier.
I – When the station indicator for any of the non-Head Account locations (i.e. the User accounts) under the Head Account is “Default”, this means that it uses the playlist selected for the Head Account's location for the same tier. This allows you to manage all the playlist settings by configuring them just for the Head Account. And then for the other locations, for any of their tiers which are set to “Default”, Auto-DJ will use the playlist selected for that tier from the Head Account. This saves you from having to configure the playlists individually for each location and tier, although you can do so if desired, to have it play a different station than the default station set for any of the Head Account's tiers.
J - This control lets you enable or disable Auto-DJ for any individual location. When you click it for the Head Account, the site will prompt whether you wish to enable/disable Auto-DJ for all locations. This makes it easy to enable or disable Auto-DJ for all locations immediately.
K - Make sure to save any changes that you make in the tier count settings for any location. This includes if you use the "To Default" button for any location as explained in G above. Station changes as well as the Enable/Disable button changes are stored immediately and do not require you to click Save Changes.
Additional Considerations:
Streaming Mode Only - Currently, Auto-DJ works only in streaming mode, hence it is important to have a reliable Internet connection.
Streaming Mode Only - Currently, Auto-DJ works only in streaming mode, hence it is important to have a reliable Internet connection.
Custom Schedule Issues - Please note that when Auto-DJ is enabled for a location, you cannot use a Custom Schedule, and Auto-DJ will override the default playlist configured to play for the location.
Want to Find Out More?
Want to Find Out More?
To learn more about Auto-DJ features and pricing or to implement it in your chain of stores, please contact us today at info@radiosparx.com.
---
Keywords: Auto-DJ, Auto DJ, Automatic DJ, Change music automatically

